This post will remain on line to offer help when you are working my Pattern called Callum #12-012. If you have my pattern you can follow the process along with the written instructions. The Pattern will be available on Patternfish in June of 2012.
(1) NECKBAND

Begin with a crochet chain with approx 10 more chain stitches than the required number of Cast-On stitches for the Neckband. Cut yarn, pull the end of the yarn through the last chain stitch. Tie a knot at the finished end to indicate which end to begin picking up the stitches and which end to begin removing the chain when the Neckband is finished.
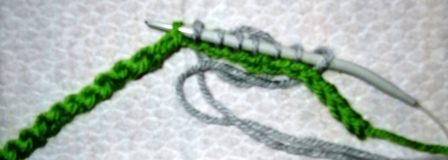
Turn your chain over and in the back you'll see horizontal "bumps". Pick up and knit the required number of stitches for the size needed through the bumps.


Join in the Round being careful not to twist stitches.


Work the rib stitches until neckband is the required length from the cast-on stitches.


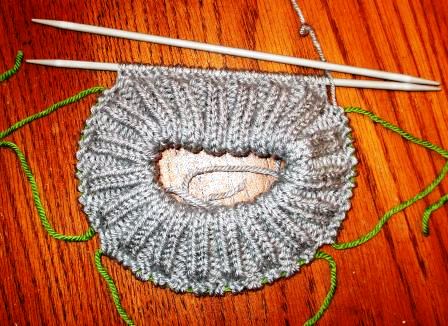
When the neckband is the required length, turn the knitting inside out to remove the Crochet Chain. Working from the knotted end of the chain, pull the tail through the last chain stitch and begin to rip the chain back to the first picked up stitch. Place the stitches on the smaller short circular needle, as you rip out each stitch of the chain.

Fold the neckband back with the right side of the ribbed stitches on the outside. Hold the two circular needles parallel.


Insert the front circular needle into the first stitch on each needle, knit the two stitches together, repeat knitting the stitches together to the end of the round.
Neckband is complete.
(2) BACK PANEL
The back panel is worked on the back of the neck stitches. The side of neck stitches and the front of neck stitches are placed on scrap yarn. Then the PANEL PATTERN is worked on the double pointed needles. When working the panels do not slip the first stitch on each row as the stitches along the sides of the panels are picked up 1 stitch for every row, to accommodate the cables worked within the next panel.

When the Back Panel is completed the stitches are placed on a piece of scrap yarn.
(3) RIGHT SHOULDER PANEL
The Right Shoulder Panel stitches are picked up along the left side of the Back Panel and then worked across the side of the neck stitches that are on the scrap yarn. The panels are worked using double pointed needles

The number of Shoulder Panel stitches are equal in number to the Centre Back Panel stitches so that the same Panel Pattern applies to the Centre Back Panel and also the two shoulder panels. Depending on the size, the number of repeats of the Panel Pattern is specified in the Pattern.

When the Right Shoulder Panel is finished, place the stitches on a piece of scrap yarn.
(4) LEFT SHOULDER PANEL
Next we move on to the Left Shoulder Panel. The side of the neck stitches are placed on the double pointed needle and then the stitches are picked up along the Right Side of the Centre Back Panel. Once again the total stitches that end up on the needle are the same as the number on the Centre Back Panel.
 |
| In this picture the back panel is on the top of the picture. |
 |
| Both Shoulder Panels are now complete |
Depending on the size, the number of repeats of the Panel Pattern is specified in the Pattern the same number of rows are worked as on the Right Shoulder Panel, then the stitches are placed on scrap yarn.
(5) FRONT YOKE PANEL
The Front Yoke Panel is worked next. The number of stitches on the yoke panel make it necessary to change to the larger, longer circular needle. The required number of stitches are picked up and knit along the Left Side of the Right Shoulder Panel. The number of stitches picked up depends on the number of repeats of the Shoulder Panels that are specified for each size. Then the set up row for the centre yoke cable is worked, then the required number of stitches are picked up and knit across the Right Side of the Left Shoulder Panel.

 | ||||
The circular needle is set up to work the Yoke Panel. The Front Yoke Panel is worked back and forth across the Circular needle until the required number of rows are worked for the specific size.
(6) BACK YOKE PANEL
When working the Back Yoke Panel the Center Back Panel stitches are placed on a double pointed needle. The Centre Back Panel is worked to raise the back of the neck and lower the front to make the neck fit comfortable. The same number of stitches are picked up along the sides of the Shoulder panel as the number on the front Yoke but you are instructed to continue the Cable following the last row of the Centre Back Panel to allow the centre cable panel to continue down the centre back of the cardigan. Once the set up is complete you work the same pattern as the front yoke, depending on the size you will be instructed to start the pattern with a specific row.

The Yoke Panel Pattern is worked down the back until the specific number of pattern repeats are complete depending on the size being worked.
 
Front view of the Yoke is on the Left and the Back view is on the Right.
(7) BODY
The Back Yoke Panel stitches remain on the circular needle. The Front Panel stitches are transferred to the same circular needle as the back Yoke stitches. Next you work the next Back Yoke Row, Cast On the required number of stitches for the underarm, then work the same row across the Front Yoke Panel. Then cast on 1/2 of the required stitches for the underarm, place a marker to indicate the beginning of the Body Round, and cast on the second half of the required cast on stitches. Note: The stitches that were cast on after placing the marker are considered to be the first stitches of the first Set Up of round. The Body is worked in the round with the back and front stitches identical.
Work the Body until the required length that is stated for each size.
(8) BOTTOM BORDER
The stitches are reduced in number to offset the extra stitches required for working the cables. The remaining stitches are a multiple of 4 stitches to work the K2, P2 rib. The Bottom Border is knit with a smaller circular needle. Next you work the sleeves. ALMOST DONE!!

(9) SLEEVES
The Sleeves are worked in the Round on Double Pointed Needles. Both Sleeves are worked identical. The Shoulder Panel Stitches are placed on a larger double pointed needle. One half of the number of stitches that were cast on at the underarm are picked up starting at the middle of the underarm cast on stitches, next you pick up and knit the required number of stitches up the side of the Front or Back Yoke Panel depending on which sleeve you are working on. Then you work the next Shoulder Panel Row, it is instructed in the pattern which row to work according the the size. Then pick up and knit down the opposite Yoke Panel, and pick up half the number of underarm cast on stitches. That is the end of the row.
Next you rearrange the stitches so that the required number of stitches are placed on each of the three double pointed needles. Work the Sleeve Pattern until the specified measurement at the underarm side of the sleeve. 
(10) SLEEVE CUFF
To set up for the cuff, you change to smaller double pointed needles and work the set up row, reducing the total number of stitches on the needles. Once again, it is important that the reduced stitches are a multiple of 4 to accommodate the K2, P2 rib. Work the rib until the required length at the underarm meets the requirements of the size measurement at the underarm.
Note: One thing that is good about No Sew and also Multidirectional Patterns, because there is no seams the body is worked together, if by chance the child is slightly taller or shorter or the arms are a different length that the specific measurement for the Chest Measurement it is possible to try on the sweater and then knit a little longer or shorter body and sleeve.
Hope this helps, MommaBearKnits and she loves to design Multidirectional Garments.
|

