Join the KAL

If you want to join the group send me your email and I will add you as an Author, which will let you post your progress, comments, questions or Pictures. berniebydesign@gmail.com

Tuesday, August 31, 2010

Section 4 - Right Front Panel

The journey is moving along -----

Section 4 Schematic
Now we are moving into the interesting part of the jouney.  Remember there was one stitch remaining on the needle when you completed Section 3.  That stitch is transferred, as instructed in both patterns (Baby & Junior Compass).  That single stitch is included with the picked-up and knit stitches when you count the total stitches on the longer circular needle.  Please make sure that you have the specified number of stitches on the needle before proceeding with Section 4.  If you find that there are one more or one less stitches on the needle just adjust by a K2tog, or a M1 on the first row worked of section 4, as the numbers are necessary to work the seed stitch and the front band.  You will notice that the seed stitch following the garter stitch band begins with a Purl stitch, that will keep the garter stitch band at 6 stitches. 

Picked-up stitches for Section 4
The picture shows the stitches picked-up along the side of the Right Sleeve Panel on the longer circular needle and the Right Front Stitches transferred to a double pointed needle, ready to be knit across.  Once again the picked-up stitches and the transferred stitches will replace Row 1 of the first pattern repeat.
The first row of the short row shaping is also a buttonhole row.  Depending on the size the number of short rows are mapped out in the Pattern Instructions. 

Section 4 Completed
When working the short row shaping a marker is placed after 6 stitches are worked on the following row, that will make the next Wrap and Turn in the proper position.  I chose to place the markers to avoid counting the last stitches in multiples of 6 at the end of the short rows before the Wrap and Turn.   The tail that is left after the final row is worked is extra long to enable the 3-needle cast on to be worked at the sleeve seam.  (In the picutre above it does not show as it is under the section.  If you find that it gets in the way while working the rest of the cardigan/jacket it can be wrapped around the fingers and pinned with a safety pin to the end of the sleeve until the garment is completed.  There are reasons for the long tail. 1) when the 3-needle cast-off is completed there will be no ends to work in at the end of the sleeve, that will give a nice smooth edge to the sleeve; 2) There will then be a yarn end to sew up the gap at the underarm.  3) The number of threads to end will be reduced although not eliminated completely.  I will post the next section Thursday.  Keep on knitting. 

Section 4 is completed ----

Mommabear keeps on knitting ----  See you all Thursday

Sunday, August 29, 2010

Section 3 Right Sleeve Panel:

Section 3 Schematic
Above is the Section 3 Schematic.  The arrows in the centre of the drawing indicate the knitting direction of each section.  Stitches are picked up and knit along the left side of section 2, then the stitches on the scrap yarn for the Right Side of the Neck are transferred to a second needle (remember the right side of neck refers to the side of the neck when the sweater/jacket is worn, not the picture.)  There is a "Note" in both patterns that clarifies the reference to the right or left side of the knitting section and the Right/Left Side of the worn garment. 
Picking up along the Left Side of Back Neck Panel
and the stitches from scrap yarn on right side of neck

The picture to the left shows the picking up along the left side of Section 2 onto the first double point needle and the transfer from the scrap yarn to the second double pointed needle.  The pick-up and knit on the side of the Back Neck Panel and the transferred stitches from the scrap yarn that is knit across to complete the row will replace the first row of the Garter/Seed Stitch Pattern that will be worked on the Right Sleeve Panel.  Once again, that is the reason for starting the pattern repeat with Row 2. 

Note: Double pointed needles are recommended for Section 3 as the rows are shorter.  If you do not have double points or prefer a circular it will work as well, just use the second circular to transfer the side neck stitches for the first row.

 
To the left is the completed Section 3.  You will note that there is one stitch remaining.  The pattern states, do not break yarn.
 
 
Section 3 is complete.


I will wait until Tuesday to post the next section.  Have a good couple of knitting days.   I am getting anxious to see your work and/or answer your questions.  If you want to post your own pictures and progress reports just send me your email and I will send you an invite to join in as an Author.  When you recieve the invite, just sign in to your google account and go for it, you may have to create an account if you don't have one, but that is free, no problem.  If you prefer not to sign in to this blog just send me your pictures and progress reports and I will prepare a post for you.  You can also make a comment in the comment section.  My email is posted on the top right-hand side of the blog.

 
-MommaBearKnits-

Saturday, August 28, 2010

The Journey Begins ---- Section 1 & 2

Butterscotch has volunteered to be the Host for this event.  He is wearing the smallest sample of Baby Compass for this assignment and he loves it.  Butterscotch will oversee the journey and keep us on track.
This post will combine Section 1 (Neckband) and Section 2 (Back Neck Panel) as they are pretty quick and easy to follow.  I am new at this kind of event and I hope it will be enjoyed as a KAL and also a reference for knitters to check out in the future.

Each posting will contain the current section schematic, picture, comments and explanations as to the method and reasons for doing so .  Questions, participants post and pictures are welcome, the more the better. There are eight sections in total and then there is a hat.  Welcome.

Are you ready, let the journey begin -----


Section  1:  Neckband. 

The pattern begins with the cast-on for the neckband.  There are 5 sizes in each version.  The first buttonholes are worked in the neckband.  Buttons will be sewn over the buttonholes on the left band for girls and on the right band for boys.  Your choice of pattern and size will give you the cast on #'s.
Section 1
Section 1 Schematic

The neckband instruction in the pattern is pretty straight forward.   Next -  move on to Section 2:

Section 2 Back Neck Panel

The Set Up Row for section 2 provides the number of stitches for the Left Front, the Left Side of Neck, Back Neck Panel, the Right Side of Neck and the Right Front.

You will note that there is a M1 in the centre of the Back Neck Panel.


Reason for MI:   The cast on for the neck band must be an even number of stitches to accommodate the K2, P2 rib and the two buttonbands that are equal to each other, however, the overall pattern for the cardigan/jacket contains a three row repeat of the seed stitch.  Seed stitch is worked on a (K1, P1) repeat to last stitch, then K1.  That requires an odd number of stitches, thus the M1 in the centre back.

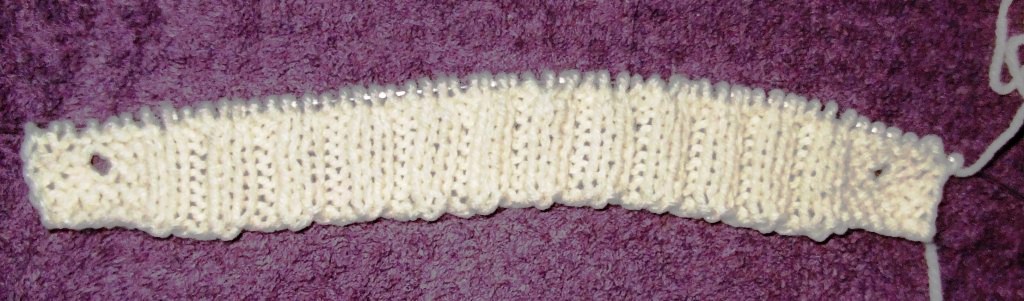
Close-Up of Garter/Seed Pattern.
Section 2 (Back Neck Panel):  The pattern repeat begins with the second row of the panel pattern.  The reason for this is that the stitches that are knit across the neckband to do the set up replace the first row of the pattern, thus you start with row 2.  Each pattern lists the number of pattern repeats for the required size which include that first set up row.

You will notice that in each panel the first stitch is a K1B and the last stitch is Yfwd, Sl 1.  This creates a nice edge for the garterstitch buttonbands and also makes an easy edge to pick up stitches along the sides of the panels.

Section 2 ends with the final row of the Garter/Seed Stitch Pattern which is a (WS) row.  Break Yarn. 
----- End of Section 2 - ---------

Section 3 Right Sleeve Panel will begin tomorrow, as it won't take long to work the first two sections.  More time will be allowed for sections that take more time to complete.  If you fall behind, no problem, the detailed posts will be available as a reference in the future. 

Have a great day, knitting. 

- MommaBearKnits------


Friday, August 27, 2010

Countdown!!!!

I have started my sample.  I am using a white DK yarn and working the Baby Compass.  Both versions will be discussed as the journey progresses.  The first post will be Saturday morning.   I will work each section, photograph it, post a schematic for the particular section and also include my reasons for what and why I did what I did.  I will also welcome questions and pictures.  One thing I would recommend for the first time, is use a solid colour yarn as self patterning yarn does not let the textured pattern stand out.  I have done them in varigated/self patterning yarn and they are nice too, but more difficult to count pattern repeats.  I have not yet tried using more than one colour, perhaps that will happen somewhere down the road, or a member of this group just may try it. 

Join me tomorrow morning the jouney begins, MommaBearKnits
The KAL for the Junior Compass looks like a lot of fun.

Knitting in all directions is always interesting and really good for getting an exact fit. I've knit your Baby J and the adult JJ Jacket and I'm looking forward to knitting a multi-directional sweater with a stitch pattern on it.


I found a photo of the Baby Compass sweaters that MommaBear knit.
Lookin' good.

Wednesday, August 25, 2010

Working on It.

I am going to start working a Compass Pattern.  Baby and Junior Compass is contructed the same and the Sections 1 - 8 will be knit, and shown step by step over the next month.  I will include, schematics for each section and plenty of photos.  I will also welcome photos from followers as well.  Keep watching, it will begin very very soon.   MommaBearKnits